
# Screens
Screens are the way users interact with your application, enabling users to search, create and edit table records.
Be default, every table will have a screen for:
- New Record
- Edit Record
- Searching Records & Results
You can also add Board and Calendar screens for each of your tables.
# Editing Screens
To customise the screens for your project, open up edit mode by clicking Edit Project in the top left hand corner.

Select Screens.

Choose the table that you would like to edit screens for in the left hand navigation bar.
From this page you can amend the layout of the:
- Create Record screen
- Edit Record screen
- Search Filter fields when searching records
- Search Results table columns when searching for records
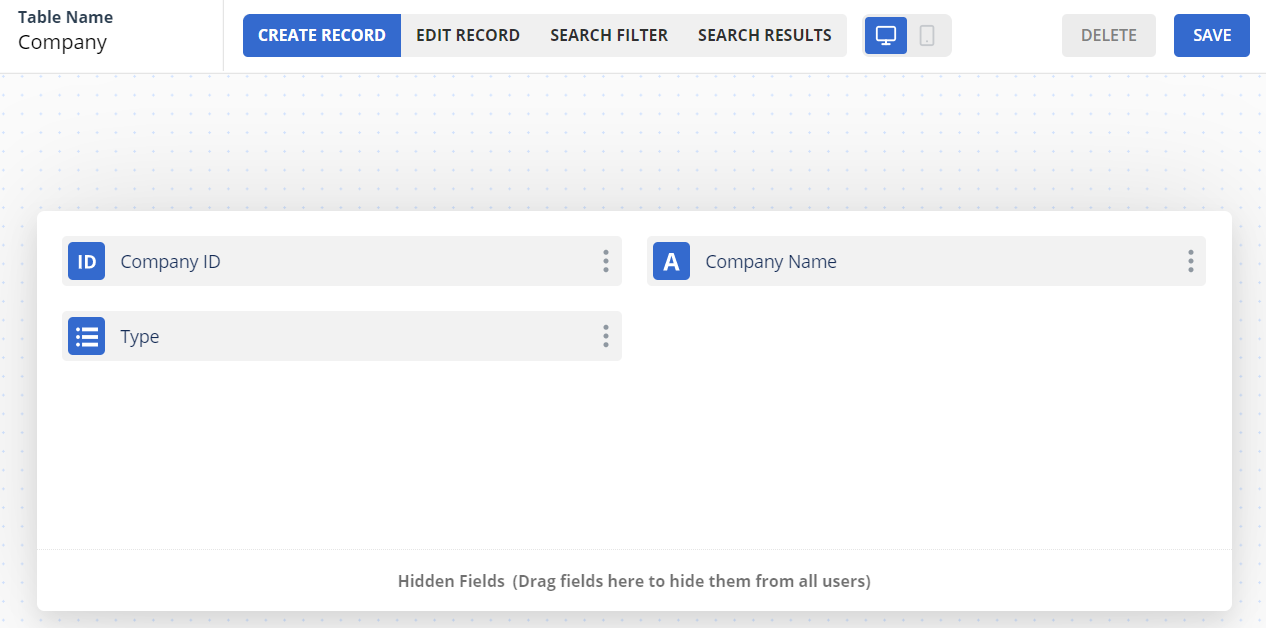
You can reorder the fields by dragging them around the screen.
To hide fields, move the field into the Hidden Fields section at the bottom of the screen. Alternatively, select the hide field checkbox on the field configuration modal.
TIP
To hide fields from only a subset of users, use permissions to control field access. See the permissions section for more information.
Once you are happy with the layout changes to your screen, click the Save button in the top right hand corner.

# Process List Fields
For the edit screens for records, you can add a process bar so that your users can clearly see the state of a current record.
To add this, select the Edit screen for a table. In the left hand navigation bar select a list field as the Process List Field.

When you view the records for this table, the selected field will show as a banner at the top of the screen.

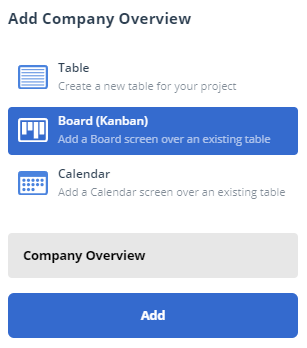
# Board Screens
Board screens can be used to display data categorised by Users, Groups & Lists.
To create a new Board screen, when you are in the Screens tab of project edit mode click Add New from the left navigation bar.

Select Board (Kanban) and give the screen a name. Click Add.
The Board settings will then show in the left hand sidebar. Ensure you select a table and the column settings. You can choose to group the records by:
| Option | Details | Example |
|---|---|---|
| List | The value in a list field | Group opportunities by the status field |
| User | The value in a user field | Group contacts by the owner field |
| Group | The group of the value in the user field | Group contacts by the group which the owner belongs to |
| Parents | The parent of the record | Group records by their parent company |
You can optionally split the cards into different rows by specifying row settings.
To customise what is shown on the card, add fields using the Choose Display Fields menu. Note that Icon and Image fields will not be available to add.
You can optionally specify that an icon from an icon field should be shown also.
It may be useful to add up certain values at the top of each column and this can be done by using the Total Field. For example, you may wish to see the total value of opportunities at each status.
Once you are happy with your board setup, click Save Changes.

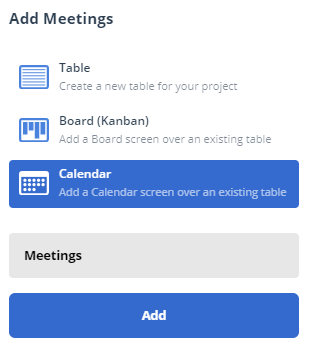
# Calendar Screens
Calendar screens allow you to display records on a day, week and month view calendar based on date fields.
To create a new Calendar screen, when you are in the Screens tab of project edit mode click Add New from the left navigation bar.
Select Calendar and give the screen a name. Click Add.
The Calendar settings will then show in the left hand sidebar. Ensure you select a table.
You can choose to view a month of events at a time by selecting the Grid calendar style. Alternatively, you can view events in columns where the columns can be days, weeks or months.
Select the fields from the table that should be used for the start and end date of the calendar events and then choose which fields should show on the calendar record. Note that Icon and Image fields will not be available to add.
Optionally, you can divide a column calendar vertically using row settings. These allow you to segment the events by time, the value in a list field, the value in a user field or the group of the value a user field.
Once you are happy with your calendar, click Save Changes.
# Custom Screens
If your account is on the Custom Plan, you can add bespoke screens to your Gridfox projects. Contact us for more information about this.
Custom screens will appear in the navigation bar for your users to access, as with all other screen types.